
Use this site to edit your C program, compiler and execute it to see its results.
Use this site to see the assembly output of a C program compiled by different compiler on different computer architectures/ISAs.
Centaurus is available via: hpc-student.uncc.edu, hpc-student.uncc.edu is both the INTERACTIVE and SUBMIT host for the cluster. If off campus, the VPN is required for access. In addition, Centaurus utilizes DUO for SSH logins. Please ensure you have set up DUO accounts. More info about the cluster, and how to access it
This is a standalone Java software that you need to download and launch the program for writing RISC-V assembly program and execute the program using simulation.
This is a Java software that you need to download and launch the program for the digital logic design and simulation.
If you ever want an actual Linux the environments for some of the development, you can use either a Linux virtual machine, or a bare-metal Linux machine that can be accessed locally or remotely. But this is not required for this course.
The development computer can be any Linux machine with required software installed. To use virtual machine, you need a virtual machine software such as VMWare, VirtualBox, Parallels etc.
If you are on a Windows platform, download VMware Workstation Player, which is free for non-commercial use. If you use Mac OS X, download the Parallels Desktop free trail for 14 days. After download, install the software by following the installation procedure.
You then need the virtual machine itself. We have created a Linux VM of Ubuntu Linux 18.04 desktop that has all the software you need loaded. For using VMware Workstation Player on Windows, download the VM file UbuntuLinux_ITSC381.ova (about 12G) to the lab computer or your own computer from the google driver folder. After download completes, use VMWare Workstation Player to import (not to create a new one) the VM file to set up the UbuntuLinux_ITSC381 VM. The VM takes up about 30G storage space. After the VM is ready, you can start the VM and the UbuntuLinux_ITSC381.ova file can be deleted.
The VM has one account setup as "ITSC3181 Lab" with password admin@123.
Since we are using VM, hardware counter must be enabled in the VM setting on VMWare Workstation Player or VMWare Fusion in order to use perf command to display instruction and cycles information. You can only enable hardware counter in the VM setting when the VM is powered off. See below screen shot for enabling hardware counter in VM Settings->Harware->Processor setting window:
If you use Mac OS X, download the Parallels Desktop free trail for 14 days. You need to download either the Pro Edition or Business Edition. After download, install the software by following the installation procedure.
You then need the virtual machine itself. We have created a Linux VM of Ubuntu Linux 18.04 desktop that has all the software you need loaded. For using Parallels Desktop on Mac OS X, download the VM file UbuntuLinux_ITSC381.pvm.zip (about 10G) from the google driver folder. After download completes, unzip the file which will create a UbuntuLinux_ITSC381.pvm folder. Then launch the Parallels Desktop application and use Parallels Desktop to Open the UbuntuLinux_ITSC381.pvm folder, which starts the VM. You can delete the UbuntuLinux_ITSC381.pvm.zip file after unzipping it.
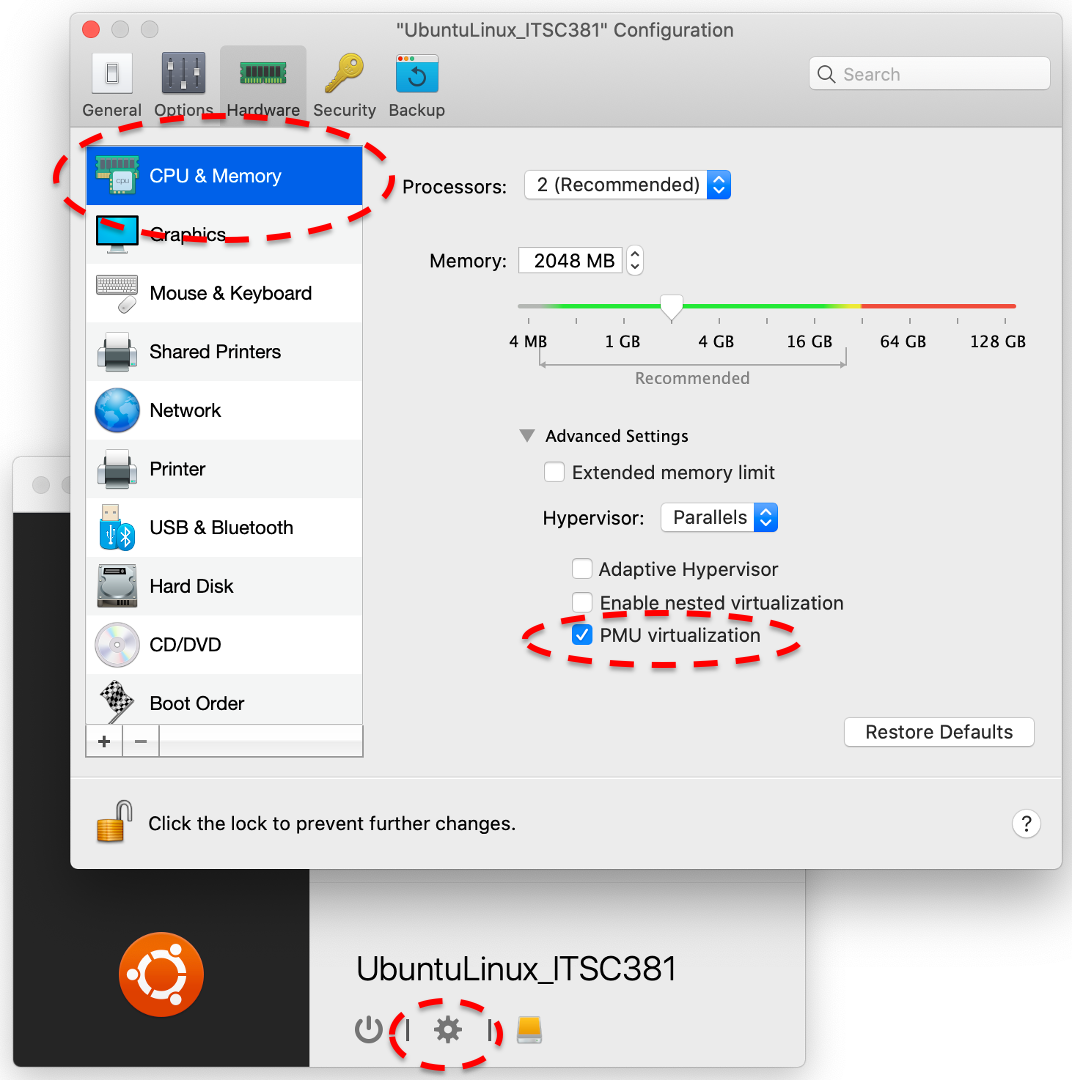
To enable hardware counter from Parallels Desktop, the UbuntuLinux_ITSC381 VM has to be shutdown. In the Setting of the UbuntuLinux_ITSC381 VM, go to Hardware Tab, CPU & Memory and check "PMU virtualization", which should enable hardware counter for the VM. See below screen shot.
The VM and host machine can share files. By default, the VM you download can access the any drive of the host machine. But it may not work since each time VM starts, it glitches here and there. You can enable sharing files between host and VM by the following instructions. Instructions for VMWare Workstation Player are show below. For Mac OS X and Parallels Desktop, you should be able to find the folder sharing in the setting for the VM.
/mnt/hgfs/ folder. 
If you already have a Ubuntu VM with VMWare or you create one by yourself, you need to install additional software in your VM to have it ready for this course. The setup will be the same as setting up a real machine, see below instructions.
A real machine can be any computer that has Linux installed (e.g. Ubuntu) and that you can access locally or remotely. It provides the same environment as a virtual machine and also allow you to do more things for system development than what a VM can provide. Installing and seting up a standard Linux computer is beyound the scope of this course. After you have standard Linux environment setup, you need to do the following to have your machine ready for this course:
/opt/riscv and /usr/local/jdk1.8.0_231. Scripts are provided (/etc/profile.d/use-java.sh and /etc/profile.d/use-riscv.sh) to set up PATH and LD_LIBRARY_PATH for the shell environment for users. sudo apt install linux-tools-common linux-tools-`uname -r` linux-cloud-tools-`uname -r` linux-tools-generic linux-cloud-tools-generic. perf stat ls command, if it shows errors and ask you to fix by modifying the file /etc/sysctl.conf, you should open the file with vi, and then go to the end of the file, add line kernel.perf_event_paranoid = -1 to the file, and then save the file, and then power off the VM. Command to open the file using vi: sudo vi /etc/sysctl.conf.sudo sh -c "echo 'kernel.nmi_watchdog=0' >> /etc/sysctl.conf", and reboot. If you do not want to reboot, disable it temporarily can be done with command sudo sysctl kernel.nmi_watchdog=0.You can use vi/vim, emacs, nano, etc to edit a file. Check Linux and C Programming (slide 5 and 6) for a short introduction to vim. I also found this Vim Basics very helpful and short.