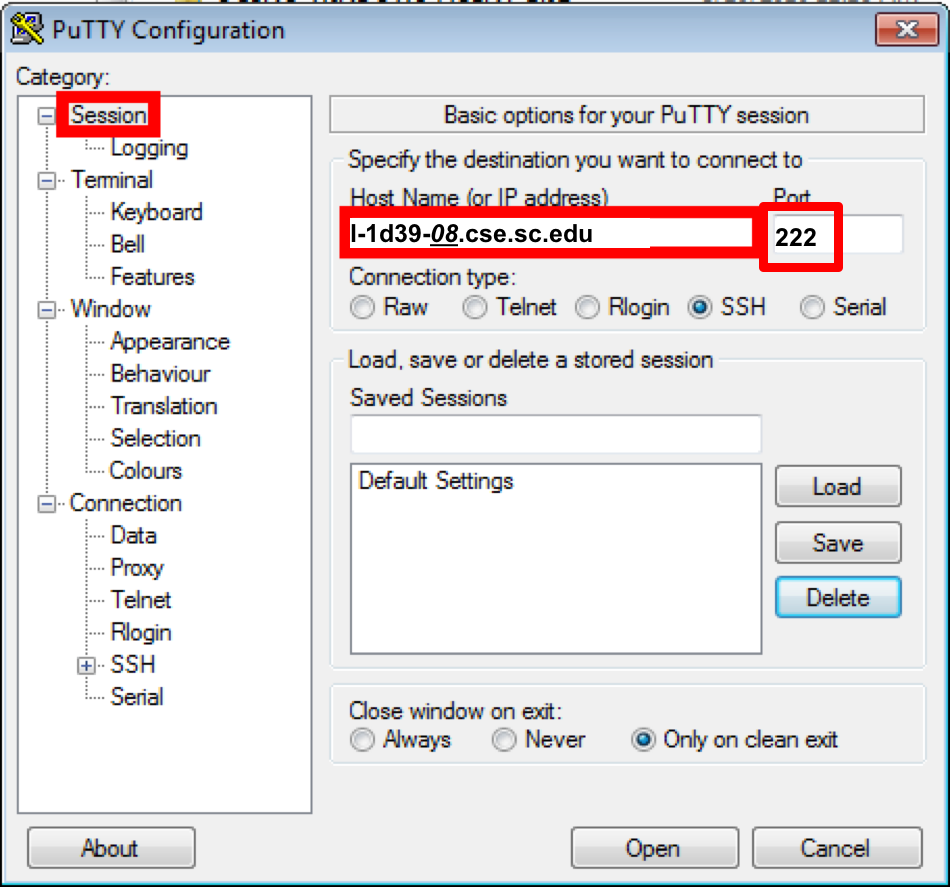
Development can be performed on the Linux machines in Swearingen 1D39 and 3D22, or your own comfortable Linux environments with necessnary tools installed, particularly OpenCV, CMake and GNU compilers. All CSCE students by default have access to these machine using their standard login credentials. Remote access is also available via SSH over port 222. Naming schema is as follows:
l-1d39-01.cse.sc.edu through l-1d39-26.cse.sc.edu
and
l-3d22-01.cse.sc.edu through l-3d22-20.cse.sc.edu
ssh -p 222 yanyh@l-1d39-20.cse.sc.eduYou are also restricted to have max 2GB of data in their home folder (~/). For more space, you can create a directory in /scratch on the login machine. However that data is not shared and it will only be available on that specific machine.
We will use the Bridges Supercomputer from Pittsburgh Supercomputing Center, which is part of the National Science Foundation's XSEDE program for running our OpenMP, MPI and GPU programs. Your development can be done in any machine that has the necessnary tools and environment setup (mainly make, cmake, gcc compiler, CUDA for GPU, and OpenCV), including those in Swearingen 1D39 and 3D22 for OpenMP and MPI development. You should report your results for assignments using machine from XSEDE. Following are the instructions on how to request accout and how to access the machine.
You can login to Bridges' hostname using your ssh client (putty on Windows, or ssh on Mac OS X or linux) bridges.psc.xsede.org or bridges.psc.edu using port 2222.
ssh -p 2222 yanyh@bridges.psc.eduNote: Your PSC username may be different from your XSEDE username and you can also use your PSC username to access via the default ssh port 22, e.g. ssh yyan@bridges.psc.edu.
To use scp or other ssh file transfer client for a file transfer you must specify a source and destination for your transfer. The format for either source or destination is
username@data.bridges.psc.edu:path/filenameusername is your PSC username (not XSEDE portal user name). If you have permission denied error, it is most likely your password is incorrectly set, please reset your password.
You should use data.bridges.psc.edu . This is the name for a high-speed data connector at PSC. We recommend using it for all file transfers using scp involving Bridges. Using it prevents file transfers from disrupting interactive use on Bridges' login nodes. E.g.
scp matmul.cu yyan@data.bridges.psc.edu:~/https://apr.psc.edu/autopwdreset/autopwdreset.html
Request a computing node (GPU) to run your program. For details of the command, check Bridges User Guide.
interact -gpuYou need to do this step each time you want a new node to compile and run your program.
If your account is also part of other projects from PSC, Bridges or other XSEDE resources, you may need to explicitly set this project ID in interact or sbatch command so your usage will be charged to this project, e.g. interact -A ci5fp7p --gpu. "ci5fp7p" is the Charge ID of our project. You can use projects command to list the projects your account is associated with and change_primary_group <ChargeID> to change the default project account for charging your usage if -A <chargeID> is not explicitly set in the command.
After your node is allocated, your sessioun will automatically login the shell environmet of the node. You then need to load the required modules for your development (mainly OpenCV, gcc compiler and CUDA) using the following command:
module load gcc/5.3.0 cuda/8.0 opencv/3.2.0 You also need to do this step each time you login in the newly allocated node to compile and run your program. If you know, you can put the command in your shell profile (~/.bash_profile or ~/.bashrc for Bash shell) so it will automatically load those modules for you each time you login a compute node.
Now you can compile and execute your program in the same way as you do from other Linux machines. It seems each of those GPU nodes has 16 cores supporting up to 32 hardware threads.
Each session lasts 60 minutes. Please also be noted that when your session is in computing node, you do not have access to the external network from that node, which means you cannot use wget or scp command to download or copy files from the computing node to or from Bridges.
sbatch command (Assignment #3):The following instruction is developed according to Bridges User Guide. Please refer to the guide for complete details and resource infomation.
Compile your MPI program using mpicc on the head node. You need to make sure all the required modules for your MPI program are loaded using module load. For example:
 module load gcc/5.3.0 cuda/8.0 opencv/3.2.0
 mpicc -lm jacobi.c -o jacobi
Create and/or modify the job launching script for sbatch command. For example, I have a job script file named sbatch-jacobi.job that has the following content.
#!/bin/bash

# Number of nodes requested
#SBATCH -N 2

# To use RM partition
#SBATCH -p RM

# Request time: 4 minutes
#SBATCH -t 00:04:00

# #Cores per node: RM each node has 28 cores
#SBATCH --ntasks-per-node  28

#project charge id:
#SBATCH -A ci5fp7p

#echo commands to stdout
set -x

#set variable so that task placement works as expected
export  I_MPI_JOB_RESPECT_PROCESS_PLACEMENT=0

#run MPI program, $SLURM_NTASKS to tell # proceses, which is 2*28 in this example
mpirun -np $SLURM_NTASKS ./jacobi
The script is written for requesting 2 nodes (#SBATCH -N 2 option), and on each node 28 MPI processes will be created (#SBATCH --ntasks-per-node 28 option) considering each node has 28 cores on RM partition. So 2x28 MPI processes in total will be created for this execution, which is passed to mpirun through the -np $SLURM_NTASKS option.
To change the number of processes for this MPI program, you can either change -N or --ntasks-per-node option, or both. But make sure -N is moderate (e.g. 2, 4 or 8 for our course example) and --ntasks-per-node is less than 28. You do NOT need to change -np $SLURM_NTASKS.
Submit the job using sbatch command from shell terminal of the head node. On a successful submission, the command should return the "Submitting batch job <jobid>" message. Take note of the jobid since you will need it to check the status or find the output of the job.
[yyan@br018 ~]$ sbatch sbatch-jacobi.job
Submitted batch job 2619853
[yyan@br018 ~]$
Check the status of the job using squeue command
[yyan@br018 ~]$ squeue -j 2619853
     JOBID PARTITION     NAME     USER ST       TIME  NODES NODELIST(REASON)
   2619853        RM jacobi     yyan PD       0:00      2 (Priority)
[yyan@br018 ~]$
When the job complete you should be able to see a file named slurm-2619853.out under your home folder and the file contains the output of the program. You can open the file to see progrom output.
[yyan@br018 ~]$ cat slurm-2619853.out
scp -P 222 local_file.txt yanyh@l-1d39-26.cse.sc.edu:~/remote_folder_under_home/scp -P 222 -r local_folder yanyh@l-1d39-26.cse.sc.edu:~/remote_folder_under_home/scp -P 222 yanyh@l-1d39-26.cse.sc.edu:~/remote_folder_under_home/remote_file.txt ./local_folderscp -P 222 -r yanyh@l-1d39-26.cse.sc.edu:~/remote_folder_under_home ./local_folderwget to directly download it from the remote machine after log-in (so no need to download locally and then copy to the remote machine). E.g. wget https://passlab.github.io/CSCE569/Assignment_1.zipYou will need to enable X forwarding when login in a remote machine usign ssh utilities (putty or ssh command) and also have a display server up running on your local machine.
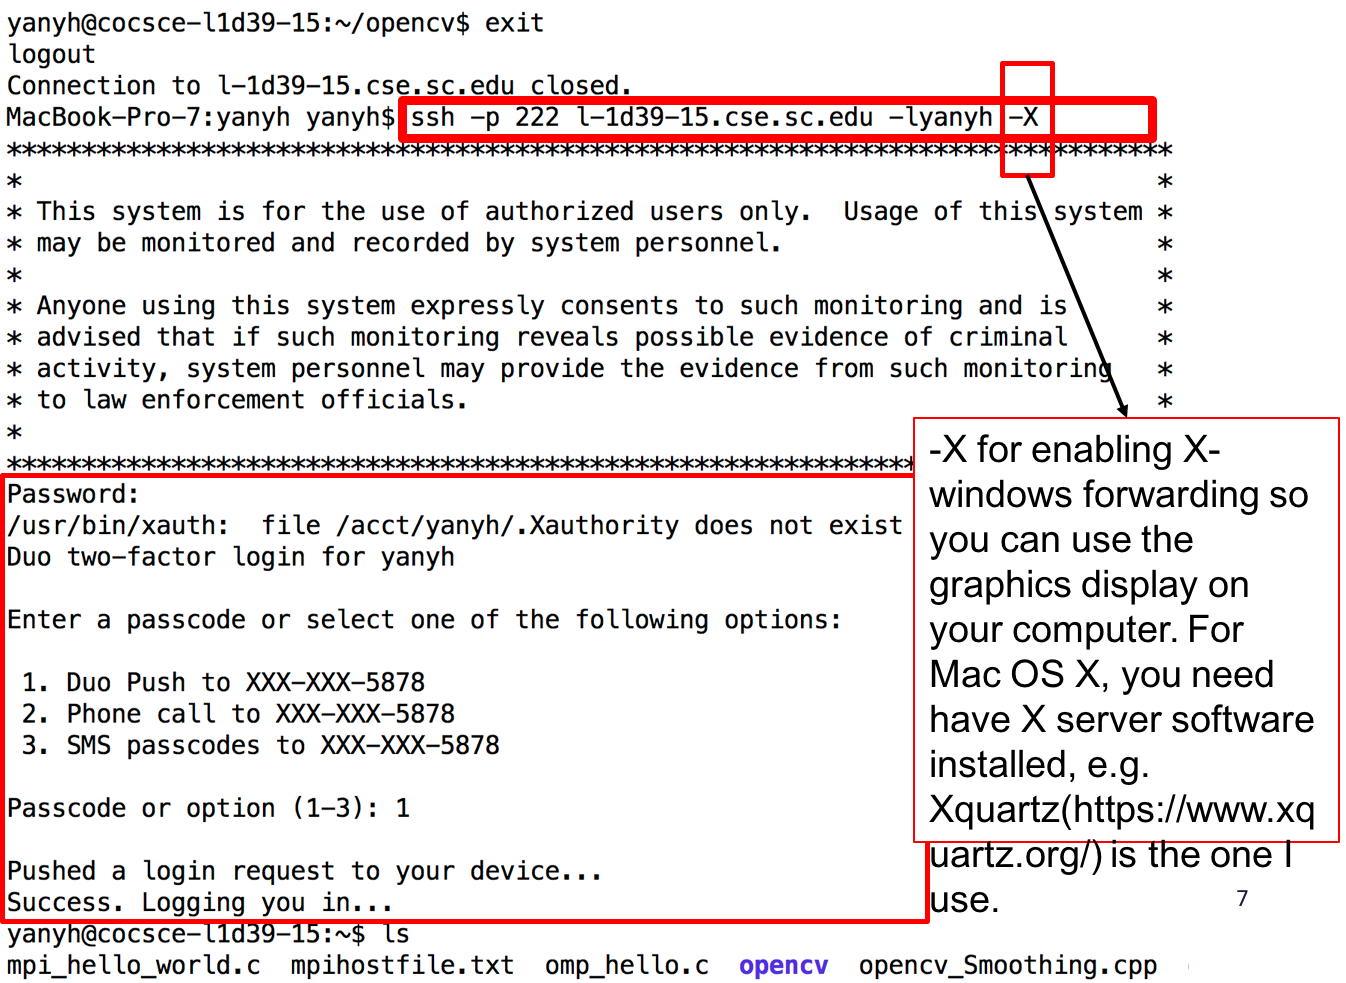
Enable X forwarding for ssh:
X forwarding option somewhere. ssh command, you will need to add -X flag, see above. Start a display server on local machine You will also need to have a display server on your local machine so GUI interface will be forwarded to your local machine to display.